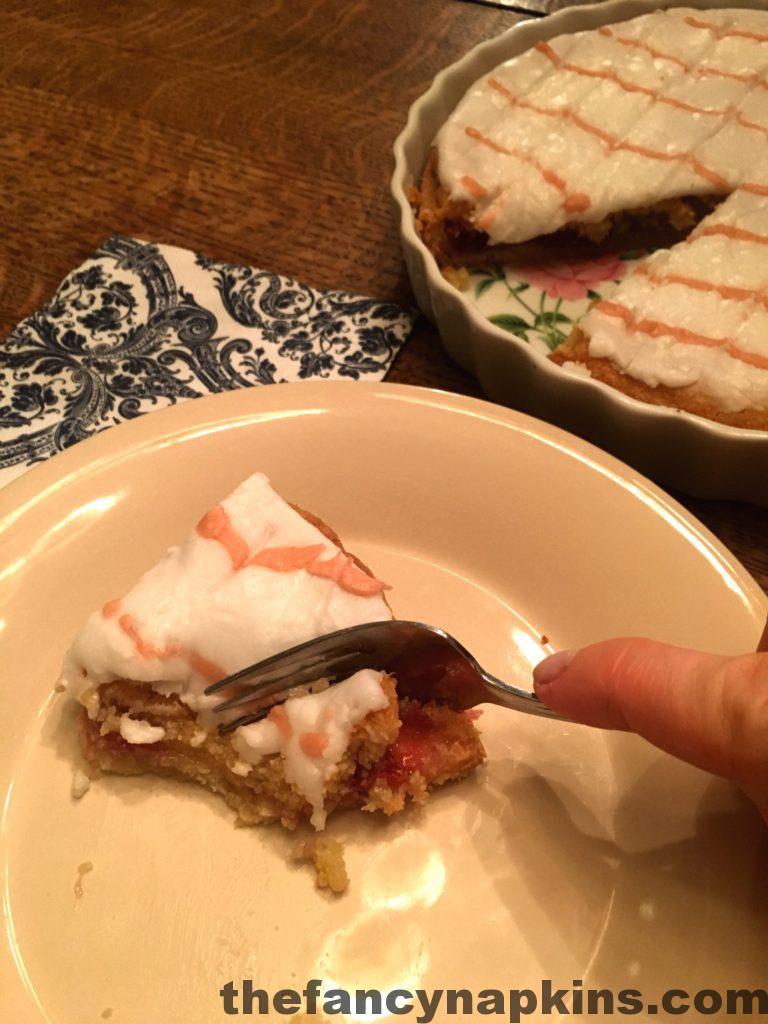
Well, this didn’t turn out quite as I expected. But that’s part of the fun of doing these reviews.. I think? Just keep an open mind and don’t judge a tart by it’s photo. Because my Bakewell Tart from Mary Berry sure is ugly! Keep on reading to hear about the process of making this thing and also to see a hilarious photo (I put it strategically at the end so you if you don’t scroll all the way down, you don’t have to see it). Please do me a favour and click that link so you can see what it was actually supposed to look like!
First thing’s first, you’re probably wondering where in the world I even thought of looking for this recipe for one, and second, who is Mary Berry? To answer the first question, when Ian and I lived in England, there was an apple orchard that also had a restaurant and we liked biking up there and having tea. The first time we went, we tried a Bakewell Slice, honestly because the icing looked so tasty. We didn’t have it very frequently, but it was sure delicious from what we can remember! Secondly, Mary Berry is an English baking icon. Judge on the BBC’s Great British Bake Off and recipe book queen. Google her, she’s legendary and you’ll wish she was your grandmother.
I finally bought a food scale the other day! I decided that since so many of the reviews I do use mass as the form of measurement, I should probably get with the program and buy a scale to do everything properly. My scale came with a faulty battery and it took me FOREVER to measure everything. I miss my measuring cups. Okay, on to the good stuff…
This recipe requires you to make jam and it is soooo easy! I recommend making it and not using store bought because store bought can be chunky (which is great on toast) but you want it to be smoother for the Bakewell Tart. I bought fresh raspberries, but seeing as it is January and they are nowhere near in season – they cost a lot and I began to wonder if I could have just used frozen berries (probably could have). I also should have used a bigger pot because I almost boiled over! I’ve never made jam before, so this was pretty cool. For “jam sugar” I just used Instant Dissolving Sugar from a bulk foods store and it worked just fine.
Once I left the jam to set and get gelly, I started on the pastry. I have never made a pastry from scratch, so I figured this is a good one to start with. I didn’t use chilled butter (oops) but I figured since I was going to be mixing with my hands, it would all become room temperature anyways. The dough mixed easily and I was nervous that it might be too sticky to roll out, but it rolled really well with a (not so light) dusting of flour. Instructions say to roll it to a Pound thickness.. so in North America, I would say that’s about two quarters. I wasn’t sure if I should grease the fluted dish or not, so I did lightly with some butter, just in case. Also, 200 degrees C is about 395 degrees F, when you’re doing your blind bake.
Speaking of blind bakes.. I really need to go buy some pie weights (maybe I will today) because it’s such a waste of rice and I don’t think I use enough rice to begin with (because I don’t want to waste it… what a vicious cycle). The pastry still puffed up! Once I took the rice out and put the crust back in for the last five minutes, the edges of the pastry really shrunk, so I think next time I won’t trim it as much. Or I should maybe keep an eye on it for the last five minutes – maybe that was too long.
It would appear that I am using recipes with almond flour (ground almonds, same thing) a lot lately, so hopefully you bought a lot at the bulk foods store! If you did, be sure to head back to my review for super tasty Oreo Macarons!
On to filling the crust.. I forgot that the directions said to only add 4 tablespoons. So to be honest, I might have had more.. or less. There was leftover jam, however, and now I want to make these English muffins again! The dough filling was easy enough to mix together but it was a bit hard to spread over the jam without the jam squishing around. Anyway, I put it in the oven at 350 degrees F for 30 minutes and then 5 minutes more. My toothpick came out clean, but I had a suspicious feeling that it was still a bit doughy. It felt like it took forever to cool (it was 1:00 AM) so I put it outside after I watched some TV, while I made the icing.
Now, this is where I ran into some issues. Well, I’m not sure ‘issues’ is the word, but hear me out. The icing was easy enough to mix together. You don’t use butter, so it’s simple actually. Although, I did forget to sift the icing sugar – I wonder if that is where my problem came from? My icing was really sticky and hard to spread evenly on top of the tart. In the photo from the recipe, it looks as if it was poured on! It’s so smooth and shiny! Mine, not so much. I literally used my fingers to try and smooth out the edges.
THEN I went to put the pink lines on. OH MY GOSH. I’m crying-screaming-laughing at myself and it’s like 2:00 AM. First, I couldn’t find a piping bag, so I used a trusty Ziploc. But the icing got too hard and I couldn’t fit it through the tip. So I CHANGED the icing tip halfway through to a bigger one, but the icing was still too hard and it was really difficult. (I forgot to mention, the pink food colouring I used, was dusty rose. Not raspberry pink. So…. there’s that.) Once I finally got all of the lines on, I placed the tart back in the oven on a low temperature to try and soften the icing so I could run a toothpick through to get the feathered effect. It helped a little bit.. but you’ve finally arrived at the photo and you can see for yourself how awful this turned out.
As for the taste, well, it is super sweet. I also don’t think it was totally cooked. So, oops. Still tastes good and still going to get demolished, I’m sure. Do I recommend this recipe? Sure! Just be patient and make sure you don’t have any other immediate plans. And make sure you have all your ingredients cause it’s not fun going to Shoppers Drug Mart at 10:30 PM for icing sugar.
Before I go, I would just like to point out to anyone who has watched GBBO or even the Canadian Baking Show.. that this would have been SO hard to do for a technical with no previous experience making a Bakewell Tart.. so much respect for those bakers!