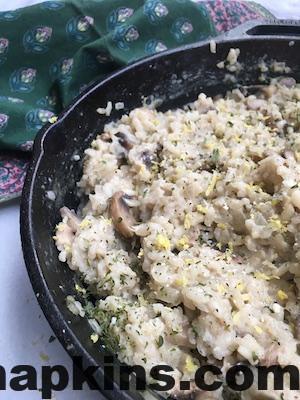
Simple Food, Fancy Napkins

Tag: easy

12 Minute Pasta

12 Minute Pasta

For this 12 Minute Pasta, I took inspiration from cacio e pepe – cheese and pepper pasta. Super simple and so delicious. This is a good one if you’ve got a few veggies in your crisper, you’re craving pasta and you don’t feel like putting…

Prosciutto and Brie Crostini with Fig

Prosciutto and Brie Crostini with Fig

I’ve been dreaming about making Prosciutto and Brie Crostini with Fig for a really long time. I can’t for the life of me remember why I chose figs though, seeing as I am pretty sure I had never even eaten them in my life until…

Review: Homemade English Muffins

Review: Homemade English Muffins

Homemade English Muffins

I am not ashamed to admit that I like English Muffins more than I like regular toast or bread. I just do. So when I was scrolling through Pinterest one day and I saw a recipe for Homemade English Muffins from blog Budget Bytes, I thought that I should do a review for them because if there’s one thing I love, it is homemade well, anything. If I don’t need to buy something premade, I don’t.

The only ingredients I had to actually go to the store for were active dry yeast and cornmeal. Now, let me give you a tip: cornmeal is not with the baking ingredients. I looked in that aisle for a solid 5-10 minutes. You will find cornmeal in the cereal aisle with flax etc.

So, to review…

Prep

The dough for these homemade English muffins is really quite easy. The directions are straight forward, although i found that after I placed them into the oven (it was off) to rise, I looked at the photos on the blog and there were additional directions and tips. So I wish that either I had looked at the whole post before I got started or that the directions in the post were the same as the ones following the photos (the latter, duh).

I took the dough out of the bowl after about 2.5 cups of flour and then kneaded by hand for 5 minutes. I used 1/2 cup more flour as I was kneading, so altogether, I did use 3 cups of flour. I wonder how these would turn out with different types of flour? I think I’ll try gluten free some time, just so you anyone who might have celiac knows they too can enjoy a homemade English muffin!

This dough was really easy to roll out and cut circles out of. I scattered the cornmeal along a baking sheet and placed the circles on it without realizing I was supposed to get cornmeal on both sides of the dough so I had to sprinkle some cornmeal on the top sides part way through rising.

As suggested in this blog post, I boiled some water and poured it into a casserole dish to put on the bottom rack of the oven to keep the dough moist while it rose. It definitely worked! I don’t know too much about the science behind this – but I am wondering if it is part of the reason my dough rose so much? Long story short, I should have kept a closer eye on the rising dough rather than just turn on a timer and go about my day. Lesson learned and now I am going to remind myself to Google if the extra heat and moisture made the dough rise quicker.

The dough circles ended up growing and touching each other. The post mentioned to try and avoid this because they could flatten when you took them apart. To hopefully avoid flat English muffins, I separated them with my flipper right before I put them onto the skillet. I found the dough to be quite delicate, so try not to handle them with your hands! Flipper only!

Cooking

The toughest thing I found about making homemade English muffins, was that it is kind of difficult to know if they are done if you’re not sure what to look for. Mine rose quite a bit, so I think they took a bit longer to cook. I probably left them on the skillet for at least 5 minutes per side. I found the ones that turned brown, were cooked best. That being said, I found them to brown better on the second side, so maybe there was too much cornmeal on the first side? So many reasons to make these again!

I was really excited to try these but the directions say to let them cool on a rack. I did, but it took a lot of patience! I felt like even on a cooling rack, they took quite a while to cool (keep in mind, I was eager to try these so even if it took only five minutes for them to cool, it felt like a lifetime).

Before I give you a few yummy suggestions on how to enjoy your homemade English muffins, I’ll toss another hint your way! The directions say to use a fork to pry the English muffins open. I found if I poked a fork through the seam around the whole muffin, it was easiest to pull it apart. You can also just cut it with a knife, obviously.

If you follow the directions exactly, you will be just fine making these homemade English muffins. I have never even baked bread before, but these were a cinch! So next time you’ve got a lazy morning, stay in your pyjamas and give these a go!

Here are a few suggestions on how to enjoy your homemade English muffins:

  • smashed avocado, hemp hearts, salt and pepper
  • peanut butter, ground flax and sliced banana
  • jam or jelly (my favourite is strawberry)
  • straight up peanut butter
  • fried egg, bacon, tomato and cheese
  • classic peanut butter and jam (or honey)
Oven Fried Chicken Thighs

Oven Fried Chicken Thighs

Chicken thighs pretending to be fried? Sign me up! One of the first things I can remember my mom delegating me to cook was Shake N Bake chicken. I don’t know why this memory sticks with me but maybe it’s because it’s always been one…

Classic Meatloaf

Classic Meatloaf

Winter is here and what better way to warm up than tossing a classic meatloaf in the oven, maybe making some Olive Oil Mashed Potatoes from Lidia Bastianich and cozying up with some tea and a game of cards after you’ve stuffed yourself and put…

Hot Mustard Chicken Fingers

Hot Mustard Chicken Fingers

Hot Mustard Chicken Fingers

Raise your hand if you’ve had the Beer and Mustard Battered Chicken Fingers from Chicago Joe’s? I feel like only a handful of you raised your hands (that handful being people in my family), and that’s fine, because there are only a few of these restaurants in existence. That being said, if you are ever near a Victoria Inn with a Chicago Joe’s make certain that you go in there and order the chicken fingers, I promise you will not be disappointed. My grandma introduced them to me many years ago and while I can probably count on one hand the number of times I have actually eaten them.. I still think about them every time I pass a Chicago Joe’s .. not to be confused with Original Joe’s…

Until then, I’ve got a recipe for you that is inspired by the delicious gift of chicken tenders that Chicago Joe’s has given the world. You’re welcome (not that they are anywhere near the same.. I don’t even use beer batter). If you’re anything like me you appreciate going into the freezer and grabbing something that you can just toss in the oven (aka frozen chicken tenders). But in the same breath, I’d much rather just make everything homemade. That’s where these come in, because they hardly take any more time than the frozen ones, are better for you and certainly, more tasty.

The recipe that follows, is for ONE chicken breast. If you are one person, I promise one chicken breast will be enough. The nice thing about this, is that you can use your multiplication skills if you are cooking for more than one person. Bear in mind that not all chicken breasts are created equally and you may need more butter, flour, hot mustard or Panko crumbs – so don’t put any of that away until they’ve gone into the oven! But honestly, one breast per person will probably be sufficient, especially if you’re cooking some sides (I peeled and chopped a sweet potato and tossed it in oil, salt and pepper with some broccoli and baked on a cookie sheet for 10 minutes at 450 degrees F.. just saying).

To make the hot mustard, I used yellow mustard and the Franks Hot Sauce that was in the fridge, which is the sauce specific for making buffalo wings. This sauce is a little bit thicker than the regular Franks, and I’m pretty sure it is a bit milder, so I do recommend buying it for this recipe. Can you use regular Franks? Of course! I would just use a lot less, taste and add more until you’ve reached a good amount of heat. Another little tid bit is that you should just buy your Panko (or regular, or gfree breadcrumbs) from a bulk foods store. I realize I say this in nearly every post, but it’s honestly the way to go! And, like I said, you can get yourself a few Dino-sours and chocolate covered almonds for the drive home.

If you’re not totally convinced that you will like these… Just dip your naked chicken fingers into the flour, then butter, then breadcrumbs. And bake for the same amount of time. Heck, if you want a variety, just put them on the same sheet and bake away! It’s easy to tell which are which, so you’re not going to be left wondering which ones have spicy bites (like the time I was greedy and tried eating a perogy straight out of the frying pan while my mom watched with a SMIRK because she knew I was about to bite into a sauerkraut perogy and I didn’t like sauerkraut yet. GROSS SURPRISE THANKS MOM)

Anywho, these are pretty quick to put together, I promise. And if you’ve gotta be gluten free.. I’m sorry that you can’t have Panko, but you can still get gluten free breadcrumbs! If you’re running low on time or energy, you can totally skip the butter and flour and simply coat the chicken in the hot mustard and then the breadcrumbs. I did them both ways, and they both were great (but who doesn’t love butter…). Oh and before I forget, yes, you can totally fry these and if you do, please let me know how delicious they were because I’m already jealous.

PS I listened to Macklemore’s most recent album on repeat while working on this so.. you should give it a whirl while you’re in the kitchen whipping up these chicken fingers/tenders/strips.

Cheers!

Hot Mustard Chicken Fingers

Prep Time20 minutes
Cook Time25 minutes
Total Time45 minutes

Ingredients

  • 1 chicken breast
  • 1/4 cup butter melted
  • 1/4 cup yellow mustard
  • 1 1/2 tbsp Franks Hot Buffalo Sauce
  • 1/4 cup flour
  • 1 cup Panko crumbs or regular breadcrumbs will work, too
  • Salt and pepper to taste

Instructions

  • Preheat oven to 375 degrees F
  • In a bowl, big enough to dredge chicken strips, mix yellow mustard and hot sauce. Add a pinch of salt.
  • Add butter, flour and Panko to three separate bowls
  • Cut chicken breast into relatively even sized 'fingers'. The amount you get will depend on the size of breast. (So you may need more or less flour, breadcrumbs, butter and hot mustard)
  • Season chicken fingers with salt and pepper
  • Line a baking sheet with foil
  • Coat each chicken finger in this order: butter, flour, hot mustard, Panko crumbs (this gets messy!)
  • Lay all chicken fingers on the baking sheet once fully coated
  • Bake in the oven for 25 minutes